In expectation of the Spring I offer you a colorful design (by Martha Stewart) that will "lighten" the flowers in your home. Complement the beauty of spring flowers with this handmade accessory for your home - an impressive vase decorated with silk rose petals.

This project is very suitable for a romantic holiday decoration. To make it you will need plastic cup of yogurt or other suitable container with a height of about 15 cm (paper, plastic or ceramic), glue (depending on the material of the container), foam paint brush, artificial rose petals (cloth).
Step 1 Choose artificial rose petals in shades of pink. If you can’t find rose petals, buy a few artificial roses and separate the petals with scissors.
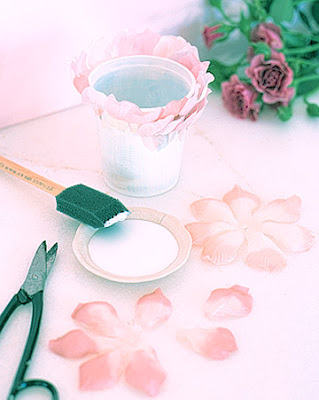
Step 2 Use a paint brush to apply some glue on the upper edge of the container. Take a petal and stick its base to the container. Notice that the biggest part of the petal shall be above the edge of the container.
Step 3 Glue a few more petals around the edge - gently overlay the petals each other. When you cover the entire edge apply some glue over the bottoms of the already glued petals to protect them from getting unstuck.
Step 4 Apply a new layer of glue just below the first row of petals. Glue the new line of petals. The petals shall overlap one other and in the same time shall overlay the row above. Continue until you cover the entire container. When you reach the bottom of the vessel fold the petals and glue their bases on the bottom of the container.

Step 5 Pour some water in the container and put a bouquet of flowers in it. If the vase is made of plastic container you may place some pebbles in it to become more stable.
Step 1 Choose artificial rose petals in shades of pink. If you can’t find rose petals, buy a few artificial roses and separate the petals with scissors.

Step 2 Use a paint brush to apply some glue on the upper edge of the container. Take a petal and stick its base to the container. Notice that the biggest part of the petal shall be above the edge of the container.
Step 3 Glue a few more petals around the edge - gently overlay the petals each other. When you cover the entire edge apply some glue over the bottoms of the already glued petals to protect them from getting unstuck.
Step 4 Apply a new layer of glue just below the first row of petals. Glue the new line of petals. The petals shall overlap one other and in the same time shall overlay the row above. Continue until you cover the entire container. When you reach the bottom of the vessel fold the petals and glue their bases on the bottom of the container.

Step 5 Pour some water in the container and put a bouquet of flowers in it. If the vase is made of plastic container you may place some pebbles in it to become more stable.
Idea: Martha Stewart
Discover more Spring decoration ideas.

This comment has been removed by a blog administrator.
ReplyDelete